Using HTTP Files for API Testing (Visual Studio)
Table of Contents
- 📖 Introduction
- 🚀 Getting Started
- 📝 Basic HTTP Request Syntax
- ⚡ Advanced Features
- 🔗 Request Chaining and Multiple Request Files
- ▶️ Executing Requests
- 🧪 Testing Workflows
- ✅ Best Practices
- ⚖️ Visual Studio vs VSCode Differences in Handling .http Files
- 🔄 Integration with CI/CD
- 🔧 Troubleshooting
- 🎯 Conclusion
- 📚 Additional Resources
📖 Introduction
HTTP files (.http or .rest) provide a simple, text-based way to define and execute HTTP requests directly within Visual Studio.
This approach offers developers a lightweight alternative to traditional API testing tools like Postman or Insomnia, keeping API tests version-controlled alongside your code.
Visual Studio’s built-in support for HTTP files makes it easy to test APIs during development without leaving your IDE, streamlining the development workflow and improving productivity.
🚀 Getting Started
Prerequisites
- Visual Studio 2022 (version 17.0 or later)
- A web API project or access to an API endpoint
Creating an HTTP File
- Right-click on your project or solution in Solution Explorer
- Select Add > New Item
- Search for “HTTP” or scroll to find HTTP File
- Name your file (e.g.,
api-tests.http) - Click Add
📝 Basic HTTP Request Syntax
Simple GET Request
GET https://api.example.com/usersRequest with Headers
GET https://api.example.com/users
Accept: application/json
Authorization: Bearer your-token-here
POST Request with JSON Body
POST https://api.example.com/users
Content-Type: application/json

{
  "name": "John Doe",
  "email": "john.doe@example.com",
  "role": "developer"
}
Multiple Requests in One File
Separate multiple requests with ###:
### Get all users
GET https://api.example.com/users

### Get specific user
GET https://api.example.com/users/123

### Create new user
POST https://api.example.com/users
Content-Type: application/json

{
  "name": "Jane Smith",
  "email": "jane.smith@example.com"
}

### Update user
PUT https://api.example.com/users/123
Content-Type: application/json

{
  "name": "Jane Smith Updated",
  "email": "jane.smith@example.com"
}

### Delete user
DELETE https://api.example.com/users/123
⚡ Advanced Features
Using Variables
Define variables at the top of your file:
@baseUrl = https://api.example.com
@userId = 123
@token = eyJhbGciOiJIUzI1NiIsInR5cCI6IkpXVCJ9...

### Get user by ID
GET {{baseUrl}}/users/{{userId}}
Authorization: Bearer {{token}}
Environment-Specific Variables
Variables in HTTP files allow you to parameterize your requests, making them reusable across different environments and scenarios.
How Variables Are Defined
Variables use a simple declaration syntax:
@variableName = valueVariables can contain:
- URLs and endpoints
- Authentication tokens
- API keys
- Request parameters
- Port numbers
- Any other string values
Where Variables Can Be Defined
1. Same HTTP File (Inline Variables)
The most common approach is defining variables directly in your .http file:
# Define variables at the top
@baseUrl = https://api.example.com
@apiVersion = v1
@userId = 123

# Use variables in requests
GET {{baseUrl}}/{{apiVersion}}/users/{{userId}}
2. Environment-Specific Variables (Comment/Uncomment Pattern)
You can maintain multiple environment configurations in the same file using comments:
# Development Environment
@baseUrl = https://localhost:5001
@apiKey = dev-api-key-12345

# Staging Environment (commented out)
# @baseUrl = https://staging-api.example.com
# @apiKey = staging-api-key-67890

# Production Environment (commented out)
# @baseUrl = https://api.example.com
# @apiKey = prod-api-key-abcde

### Test endpoint
GET {{baseUrl}}/api/health
X-API-Key: {{apiKey}}
3. Separate Configuration Files
For better organization and security, you can split variables into separate files:
config-dev.http:
@baseUrl = https://localhost:5001
@apiKey = dev-key-123
@timeout = 30config-prod.http:
@baseUrl = https://api.production.com
@apiKey = prod-key-xyz
@timeout = 60api-tests.http:
# Note: Visual Studio doesn't automatically import from other files
# You need to manually copy variables or maintain them separately
# Copy the appropriate config here based on your environment

@baseUrl = https://localhost:5001
@apiKey = dev-key-123

### Test request
GET {{baseUrl}}/api/users
X-API-Key: {{apiKey}}
4. External Environment Files (http-client.env.json)
✅ Visual Studio Support: Visual Studio 2022 supports http-client.env.json and http-client.private.env.json files for managing environment-specific variables externally.
http-client.env.json (committed to repository):
{
  "dev": {
    "baseUrl": "https://localhost:5001",
    "apiVersion": "v1",
    "timeout": "30"
  },
  "staging": {
    "baseUrl": "https://staging-api.example.com",
    "apiVersion": "v1",
    "timeout": "45"
  },
  "production": {
    "baseUrl": "https://api.production.com",
    "apiVersion": "v1",
    "timeout": "60"
  }
}
http-client.private.env.json (excluded from version control via .gitignore):
{
  "dev": {
    "apiKey": "dev-secret-key-123",
    "clientSecret": "dev-client-secret"
  },
  "staging": {
    "apiKey": "staging-secret-key-456",
    "clientSecret": "staging-client-secret"
  },
  "production": {
    "apiKey": "prod-secret-key-789",
    "clientSecret": "prod-client-secret"
  }
}
Usage in your .http file:
### Test request using environment variables
# Select environment from dropdown in Visual Studio
GET {{baseUrl}}/{{apiVersion}}/api/users
X-API-Key: {{apiKey}}
How to switch environments in Visual Studio: 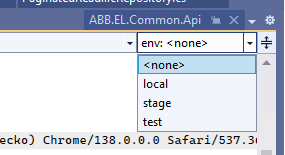
- Look for the environment dropdown in the HTTP editor toolbar
- Select your desired environment (dev, staging, production)
- Variables from both
http-client.env.jsonandhttp-client.private.env.jsonare merged - Execute your request with the selected environment’s variables
File Location:
- Place
http-client.env.jsonandhttp-client.private.env.jsonin the same directory as your.httpfiles - Or in the solution root directory
Key Benefits:
- ✅ Separate public config from secrets
- ✅ Easy environment switching via UI
- ✅ Variables merge from both files
- ✅ Private file can be gitignored
Important: Add to .gitignore:
# Exclude private environment variables
http-client.private.env.json
5. Sensitive Data Separation (Alternative Pattern)
For security, create a separate file for sensitive variables and exclude it from version control:
secrets.http (add to .gitignore):
@apiSecret = your-secret-key-here
@dbPassword = your-database-password
@privateToken = your-private-token
public-config.http (committed to repo):
@baseUrl = https://api.example.com
@apiVersion = v2
# Note: Copy secrets from secrets.http file manually
System and Predefined Variables
Visual Studio HTTP Files:
Visual Studio currently has limited support for system variables. Unlike VSCode’s REST Client extension, Visual Studio does not provide built-in system variables like timestamps or random values.
Available approaches:
- ✅ User-defined variables (manual)
- ❌ No automatic timestamp variables
- ❌ No random number generators
- ❌ No GUID generators
- ❌ No environment variable expansion
Workaround - Manual Dynamic Values:
You must manually update dynamic values:
@timestamp = 2025-10-20T10:30:00Z
@requestId = 12345-random-id
@guid = 550e8400-e29b-41d4-a716-446655440000

POST https://api.example.com/events
Content-Type: application/json
X-Request-ID: {{requestId}}
X-Timestamp: {{timestamp}}

{
  "eventId": "{{guid}}",
  "timestamp": "{{timestamp}}"
}
VSCode REST Client System Variables (Not Available in Visual Studio):
For comparison, VSCode’s REST Client offers:
{$guid}- Generate a GUID{$randomInt min max}- Random integer{$timestamp}- Current Unix timestamp{$timestamp -1 d}- Relative timestamps{$datetime iso8601}- ISO 8601 datetime{$localDatetime iso8601}- Local datetime{$processEnv variableName}- OS environment variables{$dotenv variableName}- Variables from .env file
Best Practices for Variables
- Keep sensitive data separate: Never commit API keys or passwords
- Use descriptive names:
@authTokenis better than@token1 - Group related variables: Keep environment configs together
- Document variable purpose: Add comments explaining what each variable is for
- Use consistent naming: Choose camelCase or snake_case and stick with it
Example with best practices:
# ==============================================
# API Configuration
# ==============================================

# Base Configuration
@baseUrl = https://api.example.com
@apiVersion = v1

# Authentication (from secrets.http - not committed)
@clientId = your-client-id
@clientSecret = your-client-secret
@accessToken = obtained-after-login

# Test Data
@testUserId = 12345
@testEmail = test@example.com

# ==============================================
# Requests
# ==============================================

### Get User Profile
GET {{baseUrl}}/{{apiVersion}}/users/{{testUserId}}
Authorization: Bearer {{accessToken}}
Accept: application/json
Request Comments
Add comments to document your requests:
# This endpoint returns all active users
# Requires authentication
### Get Active Users
GET https://api.example.com/users?status=active
Authorization: Bearer {{token}}
File Upload
POST https://api.example.com/upload
Content-Type: multipart/form-data; boundary=----WebKitFormBoundary7MA4YWxkTrZu0gW

------WebKitFormBoundary7MA4YWxkTrZu0gW
Content-Disposition: form-data; name="file"; filename="example.txt"
Content-Type: text/plain

< ./files/example.txt
------WebKitFormBoundary7MA4YWxkTrZu0gW--
🔗 Request Chaining and Multiple Request Files
Request chaining allows you to use the response from one request in subsequent requests, enabling complex testing workflows. Managing multiple HTTP files helps organize different API endpoints and testing scenarios.
Request Chaining in Visual Studio
⚠️ Visual Studio Limitation: Visual Studio does not support automatic request chaining. You cannot automatically extract values from a response and use them in the next request.
Manual Workflow (Copy-Paste Pattern):
@baseUrl = https://api.example.com

### Step 1: Login to get authentication token
POST {{baseUrl}}/auth/login
Content-Type: application/json

{
  "username": "testuser",
  "password": "testpass123"
}

# Response will look like:
# {
#   "token": "eyJhbGciOiJIUzI1NiIs...",
#   "userId": "12345",
#   "expiresIn": 3600
# }

### Step 2: Manually copy token from Step 1 response and paste below
@authToken = eyJhbGciOiJIUzI1NiIs...paste-your-token-here
@userId = 12345

### Step 3: Use the token to access protected endpoint
GET {{baseUrl}}/api/users/{{userId}}/profile
Authorization: Bearer {{authToken}}
Workflow Steps:
- Execute the first request (login)
- Manually copy the token from the response
- Paste it into the variable declaration
- Execute the subsequent requests
Request Chaining in VSCode (For Comparison)
VSCode’s REST Client extension supports automatic request chaining:
### Login (named request)
# @name login
POST https://api.example.com/auth/login
Content-Type: application/json

{
  "username": "testuser",
  "password": "testpass123"
}

### Automatically extract token and use it
@authToken = {{login.response.body.token}}
@userId = {{login.response.body.userId}}

### Use extracted values automatically
GET https://api.example.com/api/users/{{userId}}/profile
Authorization: Bearer {{authToken}}
Managing Multiple HTTP Files
Organizing your HTTP files by feature or API area improves maintainability and collaboration.
File Organization Strategies
1. By API Domain:
project/
├── http-tests/
│   ├── authentication.http      # Login, logout, token refresh
│   ├── users.http               # User CRUD operations
│   ├── products.http            # Product management
│   ├── orders.http              # Order processing
│   └── admin.http               # Admin operations
2. By Environment:
project/
├── http-tests/
│   ├── config/
│   │   ├── dev.http             # Development variables
│   │   ├── staging.http         # Staging variables
│   │   └── prod.http            # Production variables
│   └── tests/
│       ├── user-api.http        # User tests
│       └── product-api.http     # Product tests
3. By Test Scenario:
project/
├── http-tests/
│   ├── smoke-tests.http         # Quick health checks
│   ├── integration-tests.http   # Full workflow tests
│   ├── edge-cases.http          # Error scenarios
│ └── performance-tests.http # Load testing scenariosBest Practices for Multiple Files
Naming Convention: Use clear, descriptive names
- ✅
user-management-api.http - ❌
test1.http
- ✅
File Headers: Include documentation at the top of each file
# ==============================================
# User Management API Tests
# Author: Development Team
# Last Updated: 2025-10-20
# Description: CRUD operations for user entities
# ==============================================
Consistent Variable Names: Use the same variable names across files
- Always use
@baseUrl(not@url,@apiUrl, etc.) - Standardize authentication:
@authTokenor@bearerToken
- Always use
Section Separators: Use visual separators for clarity
### ==================== READ OPERATIONS ====================

### Get All Users
GET {{baseUrl}}/users

### Get User by ID
GET {{baseUrl}}/users/{{userId}}

### ==================== CREATE OPERATIONS ====================
Keep Files Focused: Each file should have a clear, single purpose
- Don’t mix unrelated endpoints in one file
- Split large files when they exceed ~300 lines
Version Control:
- ✅ Commit: Test files, documentation
- ❌ Don’t commit: Files with real credentials, production tokens
Cross-File Workflow Example
Since Visual Studio requires manual coordination between files:
Step 1: Set up configuration
# config.http (reference only)
@baseUrl = https://api.example.com
@apiKey = your-api-key
Step 2: Copy to auth file
# auth.http
@baseUrl = https://api.example.com  # copied from config
@apiKey = your-api-key              # copied from config

### Login
POST {{baseUrl}}/auth/login
X-API-Key: {{apiKey}}
Content-Type: application/json

{
  "username": "user",
  "password": "pass"
}

# Response: { "token": "abc123..." }
Step 3: Copy to users file
# users.http
@baseUrl = https://api.example.com  # copied from config
@authToken = abc123...              # copied from auth.http response

### Get Users
GET {{baseUrl}}/users
Authorization: Bearer {{authToken}}
This manual approach ensures clarity but requires discipline to keep variables synchronized across files.
▶️ Executing Requests
Running a Request
- Place your cursor anywhere within the request block
- Click the Send Request link that appears above the request
- Or use the keyboard shortcut: Ctrl+Alt+R
- View the response in the output pane
Viewing Responses
Visual Studio displays responses in a separate pane showing:
- Status code and reason phrase
- Response headers
- Response body (with syntax highlighting for JSON/XML)
- Response time
🧪 Testing Workflows
Authentication Flow
@baseUrl = https://api.example.com

### Step 1: Login and get token
POST {{baseUrl}}/auth/login
Content-Type: application/json

{
  "username": "testuser",
  "password": "testpass123"
}

### Step 2: Use token (manually copy from response above)
@authToken = paste-token-here

GET {{baseUrl}}/api/protected-resource
Authorization: Bearer {{authToken}}
CRUD Operations Testing
@baseUrl = https://localhost:5001/api
@productId = 0

### CREATE - Add new product
POST {{baseUrl}}/products
Content-Type: application/json

{
  "name": "Test Product",
  "price": 29.99,
  "category": "Electronics"
}

### READ - Get all products
GET {{baseUrl}}/products

### READ - Get specific product (update @productId with created ID)
GET {{baseUrl}}/products/{{productId}}

### UPDATE - Modify product
PUT {{baseUrl}}/products/{{productId}}
Content-Type: application/json

{
  "name": "Updated Product Name",
  "price": 39.99,
  "category": "Electronics"
}

### DELETE - Remove product
DELETE {{baseUrl}}/products/{{productId}}
✅ Best Practices
1. Organize Your HTTP Files
Structure your HTTP files by feature or API area:
auth.http- Authentication endpointsusers.http- User management endpointsproducts.http- Product CRUD operationsorders.http- Order processing endpoints
2. Use Meaningful Names and Comments
### Create New Customer Account
# POST endpoint for customer registration
# Required fields: email, password, firstName, lastName
POST https://api.example.com/customers
Content-Type: application/json

{
  "email": "customer@example.com",
  "password": "SecurePass123!",
  "firstName": "John",
  "lastName": "Doe"
}
3. Version Control Your HTTP Files
Include HTTP files in your repository:
- Commit them with your code
- Use
.gitignoreto exclude sensitive data files - Consider using environment variables for secrets
4. Separate Sensitive Data
Create a separate file for sensitive variables:
api-config.http (gitignored):
@apiKey = your-secret-api-key
@password = your-passwordapi-tests.http:
# Import variables from config file
# (Note: Visual Studio doesn't support file imports, use comments as reference)
@baseUrl = https://api.example.com

### Test with API key
GET {{baseUrl}}/secure-endpoint
X-API-Key: {{apiKey}}
5. Test Edge Cases
### Test valid input
POST https://api.example.com/users
Content-Type: application/json

{
  "name": "Valid User",
  "email": "valid@example.com"
}

### Test missing required field
POST https://api.example.com/users
Content-Type: application/json

{
  "name": "Invalid User"
}

### Test invalid email format
POST https://api.example.com/users
Content-Type: application/json

{
  "name": "Invalid Email",
  "email": "not-an-email"
}
⚖️ Visual Studio vs VSCode Differences in Handling .http Files
While both Visual Studio and Visual Studio Code support HTTP files, there are important differences in how they handle these files:
IDE Integration
Visual Studio:
- Native built-in support starting with Visual Studio 2022 (v17.0+)
- No additional extensions required
- Integrated directly into the IDE’s request execution framework
- Part of the Web API development toolset
VSCode:
- Requires the REST Client extension by Huachao Mao
- More lightweight and modular approach
- Extension must be explicitly installed from the marketplace
Feature Differences
| Feature | Visual Studio | VSCode (REST Client) |
|---|---|---|
| Basic HTTP requests | ✅ Yes | ✅ Yes |
| Variables | ✅ Yes | ✅ Yes |
| Environment files | ⚠️ Limited | ✅ Yes (via settings.json) |
| Request chaining | ❌ Manual | ✅ Yes (capture response variables) |
| Custom scripts | ❌ No | ✅ Yes (pre-request scripts) |
| Response history | ✅ Limited | ✅ Full history |
| GraphQL support | ⚠️ Basic | ✅ Advanced |
| Request authentication helpers | ⚠️ Manual | ✅ Yes (AWS, Azure AD, etc.) |
Variables Support Comparison
Both IDEs support variables, but with significant differences in capabilities and flexibility.
Basic Variable Declaration
Visual Studio & VSCode - Identical Syntax:
Both use the same basic syntax for declaring and using variables:
@variable = value
GET https://api.com/{{variable}}
Example (works in both):
@baseUrl = https://api.example.com
@userId = 123

GET {{baseUrl}}/users/{{userId}}
✅ Full Compatibility: Basic variable declarations are 100% compatible between both IDEs.
Variable Definition Locations
| Location | Visual Studio | VSCode (REST Client) |
|---|---|---|
| Inline in .http file | ✅ Yes | ✅ Yes |
| Environment JSON files | ✅ Yes (http-client.env.json) | ✅ Yes (settings.json) |
| Private environment files | ✅ Yes (http-client.private.env.json) | ✅ Yes (in settings.json) |
| .env file integration | ❌ Not supported | ✅ Yes (via {$dotenv var}) |
| OS environment variables | ❌ Not supported | ✅ Yes (via {$processEnv var}) |
Visual Studio - Two Options:
Option 1: Inline in .http file
@baseUrl = https://api.example.com
@apiKey = your-key-here

GET {{baseUrl}}/api/data
X-API-Key: {{apiKey}}
Option 2: External environment files (recommended)
http-client.env.json:
{
  "dev": {
    "baseUrl": "https://localhost:5001"
  },
  "prod": {
    "baseUrl": "https://api.production.com"
  }
}
http-client.private.env.json:
{
  "dev": {
    "apiKey": "dev-secret-key"
  },
  "prod": {
    "apiKey": "prod-secret-key"
  }
}
In your .http file:
# Select environment from Visual Studio dropdown
GET {{baseUrl}}/api/data
X-API-Key: {{apiKey}}
VSCode - Multiple Options:
Option 1: Inline (same as Visual Studio)
@baseUrl = https://api.example.com
GET {{baseUrl}}/api/data
Option 2: Settings file (.vscode/settings.json)
{
  "rest-client.environmentVariables": {
    "$shared": {
      "apiVersion": "v1"
    },
    "dev": {
      "baseUrl": "https://localhost:5001",
      "apiKey": "dev-key"
    },
    "prod": {
      "baseUrl": "https://api.production.com",
      "apiKey": "prod-key"
    }
  }
}
Then in your .http file:
# Variables come from settings.json
GET {{baseUrl}}/{{apiVersion}}/data
X-API-Key: {{apiKey}}
Option 3: Environment variables
# Access OS environment variables
GET https://api.example.com
X-API-Key: {{$processEnv API_KEY}}

# Access .env file variables
Authorization: Bearer {{$dotenv AUTH_TOKEN}}
System and Dynamic Variables
| Variable Type | Visual Studio | VSCode (REST Client) |
|---|---|---|
| User-defined variables | ✅ Yes | ✅ Yes |
| Timestamps | ❌ Manual only | ✅ {$timestamp} |
| Random integers | ❌ Manual only | ✅ {$randomInt min max} |
| GUIDs | ❌ Manual only | ✅ {$guid} |
| Date/time formatting | ❌ Manual only | ✅ {$datetime format} |
| Relative timestamps | ❌ Not supported | ✅ {$timestamp -1 d} |
Visual Studio - Manual Dynamic Values:
You must manually update values that need to be dynamic:
# Manually updated before each request
@requestId = 12345
@timestamp = 2025-10-20T10:30:00Z
@guid = 550e8400-e29b-41d4-a716-446655440000

POST https://api.example.com/events
Content-Type: application/json
X-Request-ID: {{requestId}}

{
  "eventId": "{{guid}}",
  "timestamp": "{{timestamp}}"
}
VSCode - Automatic Dynamic Values:
# Automatically generated each time the request is sent
POST https://api.example.com/events
Content-Type: application/json
X-Request-ID: {{$randomInt 10000 99999}}
X-Timestamp: {{$timestamp}}

{
  "eventId": "{{$guid}}",
  "timestamp": "{{$datetime iso8601}}",
  "scheduledFor": "{{$timestamp 1 d}}"
}
Available VSCode System Variables:
{$guid}- RFC 4122 v4 GUID{$randomInt min max}- Random integer between min and max{$timestamp [offset unit]}- Unix timestamp in seconds- Examples:
{$timestamp},{$timestamp -1 d},{$timestamp 2 h}
- Examples:
{$datetime format [offset unit]}- Formatted datetime- Formats:
iso8601,rfc1123, custom - Examples:
{$datetime iso8601},{$datetime 'YYYY-MM-DD' -1 d}
- Formats:
{$localDatetime format [offset unit]}- Local time formatted{$processEnv variableName}- OS environment variable{$dotenv variableName}- Variable from .env file
Response Variable Capture (Request Chaining)
| Capability | Visual Studio | VSCode (REST Client) |
|---|---|---|
| Capture response values | ❌ Manual copy-paste | ✅ Automatic |
| Reference previous responses | ❌ Not supported | ✅ Yes (named requests) |
| Extract JSON path | ❌ Not supported | ✅ Yes |
| Extract headers | ❌ Not supported | ✅ Yes |
| Use in next request | ❌ Manual only | ✅ Automatic |
Visual Studio - Manual Workflow:
### Step 1: Login
POST https://api.example.com/auth/login
Content-Type: application/json

{
  "username": "user",
  "password": "pass"
}

# Response (manually inspect):
# {
#   "token": "eyJhbGc...",
#   "userId": "12345"
# }

### Step 2: Manually copy values from Step 1 response
@authToken = eyJhbGc...paste-token-here
@userId = 12345

### Step 3: Use manually copied values
GET https://api.example.com/users/{{userId}}
Authorization: Bearer {{authToken}}
VSCode - Automatic Workflow:
### Step 1: Login (name the request for reference)
# @name login
POST https://api.example.com/auth/login
Content-Type: application/json

{
  "username": "user",
  "password": "pass"
}

### Step 2: Automatically extract values from previous response
@authToken = {{login.response.body.token}}
@userId = {{login.response.body.userId}}

### Step 3: Automatically use extracted values
GET https://api.example.com/users/{{userId}}
Authorization: Bearer {{authToken}}

### Step 4: Can also extract headers
@rateLimit = {{login.response.headers.X-RateLimit-Remaining}}
VSCode Advanced Extraction:
### Create User
# @name createUser
POST https://api.example.com/users
Content-Type: application/json

{
  "name": "John Doe",
  "email": "john@example.com"
}

### Extract nested values using JSONPath-like syntax
@newUserId = {{createUser.response.body.data.user.id}}
@createdAt = {{createUser.response.body.data.timestamp}}
@locationHeader = {{createUser.response.headers.Location}}

### Use extracted values in subsequent request
GET {{locationHeader}}
Authorization: Bearer {{authToken}}
Environment Management
| Feature | Visual Studio | VSCode (REST Client) |
|---|---|---|
| Multiple environments | ✅ http-client.env.json | ✅ settings.json |
| Per-environment variables | ✅ JSON config file | ✅ settings.json config |
| Environment selector | ✅ Dropdown in editor | ✅ Status bar selector |
| Shared variables | ⚠️ Repeated in each env | ✅ $shared section |
| Private variables | ✅ http-client.private.env.json | ⚠️ Mixed with public in settings |
Visual Studio - Environment Files:
http-client.env.json:
{
  "dev": {
    "baseUrl": "https://localhost:5001",
    "apiVersion": "v1"
  },
  "staging": {
    "baseUrl": "https://staging-api.example.com",
    "apiVersion": "v1"
  },
  "production": {
    "baseUrl": "https://api.production.com",
    "apiVersion": "v2"
  }
}
http-client.private.env.json:
{
  "dev": {
    "apiKey": "dev-secret-key"
  },
  "staging": {
    "apiKey": "staging-secret-key"
  },
  "production": {
    "apiKey": "prod-secret-key"
  }
}
In your .http file:
### Make request (select environment from dropdown)
GET {{baseUrl}}/{{apiVersion}}/api/health
X-API-Key: {{apiKey}}
Switch environments: Use the environment dropdown in the Visual Studio HTTP editor toolbar.
VSCode - Environment Switcher:
In .vscode/settings.json:
{
  "rest-client.environmentVariables": {
    "$shared": {
      "apiVersion": "v1",
      "contentType": "application/json"
    },
    "local": {
      "baseUrl": "https://localhost:5001",
      "apiKey": "dev-key"
    },
    "dev": {
      "baseUrl": "https://dev-api.example.com",
      "apiKey": "dev-key"
    },
    "staging": {
      "baseUrl": "https://staging-api.example.com",
      "apiKey": "staging-key"
    },
    "production": {
      "baseUrl": "https://api.production.com",
      "apiKey": "prod-key"
    }
  }
}
In your .http file:
### Make request (variables auto-populate based on selected environment)
GET {{baseUrl}}/{{apiVersion}}/health
X-API-Key: {{apiKey}}
Content-Type: {{contentType}}
Switch environments via:
- Status bar: Click “No Environment” → Select environment
- Command Palette: “Rest Client: Switch Environment”
Variable Scope and Precedence
Visual Studio:
- Two scopes with precedence:
- Inline variables in .http file (highest priority)
- Environment variables from http-client.env.json + http-client.private.env.json (merged)
- Variables from selected environment override inline if both are defined
- Within same scope, last declaration wins
Example precedence:
# Inline variable (lower priority when environment is selected)
@baseUrl = https://default.example.com

# If environment "dev" is selected, baseUrl from http-client.env.json overrides
GET {{baseUrl}}/api/users
VSCode:
- Multiple scopes with precedence:
- Request-level variables (highest priority)
- File-level variables
- Environment-specific variables (settings.json)
- Shared variables (
$sharedin settings.json) - System variables (lowest priority)
Practical Comparison Summary
Choose Visual Studio when:
- ✅ Working within Visual Studio IDE for .NET projects
- ✅ Need environment management via JSON files (http-client.env.json)
- ✅ Want to separate public and private variables (two-file approach)
- ✅ Basic to intermediate variable needs (URLs, tokens, IDs)
- ⚠️ Can accept manual request chaining (copy-paste workflow)
- ⚠️ Don’t need dynamic values (timestamps, GUIDs)
- ✅ Want native IDE integration without extensions
Choose VSCode when:
- ✅ Need automated request chaining (response variable extraction)
- ✅ Require dynamic values (timestamps, random data, GUIDs)
- ✅ Want to use OS environment variables or .env files
- ✅ Need advanced variable extraction from responses (JSONPath)
- ✅ Prefer centralized environment configuration in workspace settings
- ✅ Working across different technology stacks
- ✅ Need shared variables across all environments (
$shared)
Settings and Configuration
Visual Studio:
- Settings managed through Visual Studio Options
- Limited configuration options
- No per-workspace HTTP client settings
VSCode:
// .vscode/settings.json
{
  "rest-client.environmentVariables": {
    "dev": {
      "host": "localhost:5001",
      "apiKey": "dev-key"
    },
    "prod": {
      "host": "api.production.com",
      "apiKey": "prod-key"
    }
  },
  "rest-client.defaultHeaders": {
    "User-Agent": "vscode-rest-client"
  }
}
Request Execution
Visual Studio:
- Click “Send Request” link above request
- Keyboard shortcut:
Ctrl+Alt+R - Response opens in output window
VSCode:
- Click “Send Request” link above request
- Keyboard shortcut:
Ctrl+Alt+R(Windows/Linux) orCmd+Alt+R(Mac) - Response opens in new editor tab
- Can view multiple responses side-by-side
Response Viewing
Visual Studio:
- Response in bottom output pane
- Basic syntax highlighting
- Limited response navigation
VSCode:
- Full editor tab for responses
- Rich syntax highlighting
- Response can be saved as file
- Response links are clickable
- Better formatting for large responses
- Response time and size displayed
When to Use Which
Choose Visual Studio when:
- Already working in Visual Studio 2022+
- Testing ASP.NET Core APIs in the same solution
- Need minimal setup without extensions
- Working primarily within .NET ecosystem
- Prefer native IDE integration
Choose VSCode when:
- Need advanced features like request chaining
- Working with multiple environments
- Require response history tracking
- Need automated variable extraction from responses
- Working across different technology stacks
- Want lightweight, extension-based approach
- Need pre-request scripting capabilities
Migration Considerations
HTTP files are largely compatible between both IDEs for basic scenarios:
- ✅ Basic request syntax is identical
- ✅ Variable declarations work the same
- ✅ Request separators (
###) are compatible - ⚠️ Advanced VSCode features won’t work in Visual Studio
- ⚠️ Environment-specific settings need manual adaptation
🔄 Integration with CI/CD
While HTTP files are great for manual testing, consider these approaches for automation:
Generate Tests from HTTP Files
Convert your HTTP files to automated tests:
// Example: xUnit test inspired by HTTP file
[Fact]
public async Task GetUsers_ReturnsSuccessStatusCode()
{
    // Arrange
    var client = _factory.CreateClient();

    // Act (based on HTTP file request)
    var response = await client.GetAsync("/api/users");

    // Assert
    response.EnsureSuccessStatusCode();
}
Use as Living Documentation
- Keep HTTP files updated alongside code changes
- Use them as examples in API documentation
- Reference them in README files for quick testing
🔧 Troubleshooting
Common Issues
Issue: Request not executing
- Ensure cursor is within the request block
- Check for syntax errors in the request
- Verify the request URL is accessible
Issue: Variables not resolving
- Verify variable declaration syntax:
@varName = value - Ensure variables are defined before use
- Check for typos in variable names:
{varName}
Issue: Authentication failures
- Verify token/credentials are current
- Check authorization header format
- Ensure token hasn’t expired
Issue: Response not displaying
- Check Output window for errors
- Verify API endpoint is accessible
- Check firewall/network settings
🎯 Conclusion
HTTP files in Visual Studio provide a powerful, code-first approach to API testing. By keeping your API tests as simple text files alongside your code, you can:
- Version control your API tests
- Share test scenarios with team members
- Document API usage through examples
- Test quickly without leaving your IDE
- Maintain tests as your API evolves
While they may not replace comprehensive API testing tools for all scenarios, HTTP files excel at providing fast, developer-friendly API testing during the development process. Understanding the differences between Visual Studio and VSCode implementations helps you choose the right tool for your specific needs and leverage the appropriate features for your workflow.
📚 Additional Resources
- Visual Studio HTTP file documentation
- REST Client for VSCode
- HTTP request syntax reference
- Testing ASP.NET Core APIs
Last updated: October 2025